How to enable early-start for students with special accommodations
This article will show you how to make special accommodations by allowing individual students to start early.
This Guide is for:
- Super Admin
- Teacher Admin (Full-Access)
- Teacher (Owner Full-Access)
Contents:
II. Steps on how to enable early start for individual students during activity publishing.
III. Steps on how to view early start accommodations from the activity dashboard.
Early Start allows selected students to access the activity for a designated duration before it opens for all students. To enable Early Start, the special accommodations setting must first be applied at a Course level.
The Early Start duration is a window of time designated by the instructor, and is not related to any default student accommodation timings.
Steps on how to set Course level - default extra time accommodations (applied to all activities in the course):
Step 1: On the Students tab, click on the ‘Accommodations’ button.
/Accommodation-student-1.png?width=688&height=472&name=Accommodation-student-1.png) Step 2: On Student Accommodations page, select checkbox beside student’s name (multiple students can be selected)
Step 2: On Student Accommodations page, select checkbox beside student’s name (multiple students can be selected)
/Accommodation-select%20student.png?width=688&height=487&name=Accommodation-select%20student.png)
Step 3: Go to ‘Select Accommodations’ dropdown and select the relevant extra time option.
/Accommodations-dropdown.png?width=688&height=486&name=Accommodations-dropdown.png) Step 4: A pop-up will appear to review the extra time settings for selected students. Click ‘Confirm’ button.
Step 4: A pop-up will appear to review the extra time settings for selected students. Click ‘Confirm’ button.
/Accommodations-confirm.png?width=688&height=409&name=Accommodations-confirm.png) Step 5: Settings are applied on Accommodations column on the Student Accommodations page.
Step 5: Settings are applied on Accommodations column on the Student Accommodations page.
On the ‘Students’ tab view, a purple icon will appear next to the name of student that had been allocated extra time.
This is viewable by the instructor only.
/Accommodations-applied%20students.png?width=688&height=469&name=Accommodations-applied%20students.png)
Steps on how to enable early start for individual students during activity publishing:
Early Start only applies to activities with the following requirements
- Synchronous Individual activity (IRAT, Individual Application Case, Peer Evaluation)
- Has a time limit
- Has students with default accommodations (multiples format)
Synchronous Activities
Step 1: On Step 6 "Publish Activity", turn on ‘Set a Time Limit’ button under ‘Activity Duration’
/Accommodations-turn%20on.png?width=688&height=341&name=Accommodations-turn%20on.png) Step 2: Students with Accommodations section is shown.
Step 2: Students with Accommodations section is shown.
The 'Apply Settings to Activity’ toggle is turned ON by default (Student Accommodations automatically applied, option to disable)
/Early%20Start-turn%20on.png?width=688&height=418&name=Early%20Start-turn%20on.png) Step 3: Click on the ‘Add As Extra Time’ dropdown and select 'Enable Early Start'.
Step 3: Click on the ‘Add As Extra Time’ dropdown and select 'Enable Early Start'.
Add on Extra Time allows the student designated extra time after the activity ends.
Enable Early Start allows selected students to start an activity early before it opens for the other students.
/Early%20Start-select.png?width=688&height=442&name=Early%20Start-select.png) Step 4: In the pop-up, select one or multiple students, and set early start duration. Click 'Confirm' to apply changes.
Step 4: In the pop-up, select one or multiple students, and set early start duration. Click 'Confirm' to apply changes.
/Early%20Start-popup.png?width=688&height=602&name=Early%20Start-popup.png) Step 5: Click ‘Publish’ button
Step 5: Click ‘Publish’ button
/Acoommodations-publish%20activity.png?width=688&height=361&name=Acoommodations-publish%20activity.png)
Steps on how to view early start accommodations from the activity dashboard:
Step 1: Ensure there is an ‘Early Start is enabled’ indicator above the 'Start Activity' button,
/Early%20start-activity-start.png?width=688&height=157&name=Early%20start-activity-start.png) In Activity Settings, Enable Early Start indicates YES
In Activity Settings, Enable Early Start indicates YES
/Early%20start-activity%20settings.png?width=688&height=459&name=Early%20start-activity%20settings.png) Step 2: When you click on the 'Start Activity' button, there will be a pop-up. Select the Activate Early Start option, and check that the duration is correct.
Step 2: When you click on the 'Start Activity' button, there will be a pop-up. Select the Activate Early Start option, and check that the duration is correct.
Click ‘Start’ to begin Early Start.
Once the Early Start timer is started, there is no option to pause the timer.
/Early%20Start-popup-start.png?width=688&height=730&name=Early%20Start-popup-start.png)
Step 3: The timer will start running, with a light blue background indicating the activity timer is currently on Early Start.
- The Activity Status will also show a clock icon next to the running timer.
- Students on Early Start will also see the timer status with a clock icon.
/Early%20Start-timer%20starts%20running.png?width=688&height=84&name=Early%20Start-timer%20starts%20running.png)
Students who have been allowed to start during Early Start will have an ‘Early’ tag indicated next to their names in Attendance.
Once a student submits their activity during Early Start, they will not be able to access the activity again later on. We suggest that students with Early Start do not click submit.
/Early%20Start-attendance.png?width=688&height=441&name=Early%20Start-attendance.png)
When Early Start is on-going, there are no other options available besides ending the Early Start. This means that pausing or adding extra time is not possible.
If you wish to end Early Start before the timer runs out -
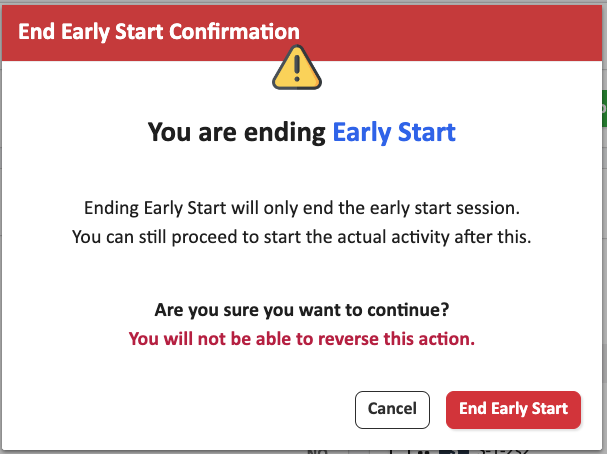
Step 4: Click ‘End Early Start’ to end the Early Start period. A pop-up will appear asking you to confirm this action.
/Early%20start-end.png?width=688&height=94&name=Early%20start-end.png)
![InteDashboard_Logo_V3.png]](https://help.intedashboard.com/hs-fs/hubfs/Branding/Logo/InteDashboard%20Logo%20(No%20Tagline)/InteDashboard_Logo_V3.png?width=250&height=63&name=InteDashboard_Logo_V3.png)
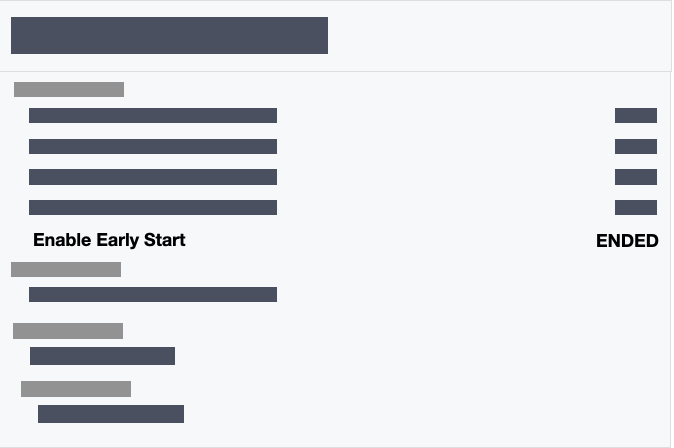
 Step 5: You will notice that Enable Early Start in Activity Settings now indicates ‘ENDED’